
Most of the people who read my blog posts will not have heard of Bellini. Or even know what a C41 process is. Let’s start by saying that whilst, from the title, this looks like it’s going to be a pretty niche blog post, there are some photographs to look at too. So, if you’re not massively into your home processing, scroll on and enjoy the images.
For those of you who are staying with the text, I hope you’ll find this helpful. I should also mention that all views expressed are only my own opinion based on my experience.
The Past
I’ve been processing my own colour film for a while now, maybe three years or thereabouts. I came at it from a financial point of view. I used to use the excellent UK Film Lab. But then they became Canadian Film Lab. I’m sure you can work out what changed. The problem that I had was that Christian & Erica at UKFL were just so damn good at what they did, that when I tried to find a new lab, everyone came up short. At least the ones in my price range did anyway. That’s when I decided to start doing it myself. I’m not going to bore anyone with what kit I use – everyone has their own temperature control methods, agitation methods etc. I want to specifically talk about chemistry.
I started off with Tetenal C41 3 stage kits, with the Bleach & Fix together. The results were acceptable and I was happy. Then it got really difficult to find anyone who had any in stock. Recently, Tetenal have had some financial difficulties and I think that they had a buy out from their employees? I hope so, I like it when that happens & if it’s true, I wish them the best of luck. After that, I moved on to Rollei. The Rollei kits were almost identical to the Tetenal ones except I just wasn’t quite getting the results I wanted. Things just looked a little…well…flat. Shadows seemed to have a red cast. Grass was never quite the right green. I know you can fix all that in the scan but I just didn’t want to.
Digibase
Then, I made a mistake. I was going to give the Rollei one last go & try to get it right, but, instead of buying the 3 stage kit, I accidentally bought Digibase. I believe the term the kids are using these days is O.M.G.!! (I’m actually pretty sure that kids aren’t saying that anymore and I’m just showing how unhip I am. As is using ‘unhip’ outside of the 1970’s). Words cannot describe how I hated that process. Digibase has so many steps. Splitting the Bleach and Fix is fine. It’s when you add in all of the rinses necessary between stages that it becomes some all-consuming, mad scientist kind of affair. Digibase and me – we’re not friends.
The Present
That’s when I got to Bellini. I saw a Facebook post, at just the right time, while I was looking for a new C41 process. It’s spooky how that happens, isn’t it? Those rather splendid people at Nik & Trick were selling something touted as ‘The best C41 kit available anywhere’. How could anyone refuse that?
There was an initial disaster where I mixed up the kit only to discover that my Bleach bottle had a split in it. I only noticed when my water bath turned yellow (Insert your own bath / yellow liquid leakage gags here) so I ordered some more. It came very quickly (Thanks N&T) and I mixed it up.
Bellini is pretty much a four stage process. Dev, Bleach, Fix, Stabiliser. There are a couple of peculiarities though. The instructions indicate that the bleach process is 45 seconds long. Right the way through all of the rolls that the kit will process. 45 seconds?? That can’t be right, can it? I messaged Nik & Trick and confirmed that it was, in fact, correct. Then there’s the Stabilisation. They give you way more stabiliser than you need for the kit. Use it. I do 3 washes in stabiliser.
One agitated (which bubbles up and can cause bubbly drying marks).
One standing (which washes the bubbles off and gets rid of the above problem)
One standing, again, because why not?
The Process
I did have an issue. Something just wasn’t right. My highlights were yellowy and there were some blue fluid like streaks (fluid like = wobbly, not linear like film scratches) so I spoke to the guys at N&T again. They gave some helpful suggestions including a wash between Fix and Stabiliser. It helped, but didn’t solve it fully.
In the end, it came down to was the Bleach process. 45 seconds is great for finishing the process and being done in time for coffee and biscuits. Unfortunately, it doesn’t allow much time for even dispersion and agitation. I doubled the Bleach time. Groovy – Job done. The results were excellent. I suspect it comes down to me hand processing, rather than being a Fancy-Dan and using a Jobo or even a mini lab.
Here you go, this is how the process ended up for me. It’s not too different to the instruction manual, but the small changes really made a big difference to my hand process.
| Stage | Time | Notes |
| Pre-Warm | 3 mins | |
| Developer | 3:15 mins | |
| Bleach | 1:30 mins | Constant Agitation |
| Fix | 1:30 mins | |
| Rinse | 1:00 min | Constant Agitation – This stage is not in the instructions |
| Stabiliser 1 | 1:00 min | Constant Agitation – will create a winter wonderland in your dev tank |
| Stabiliser 2 & 3 | 1:00 min each | Stand – to remove the winter wonderland |
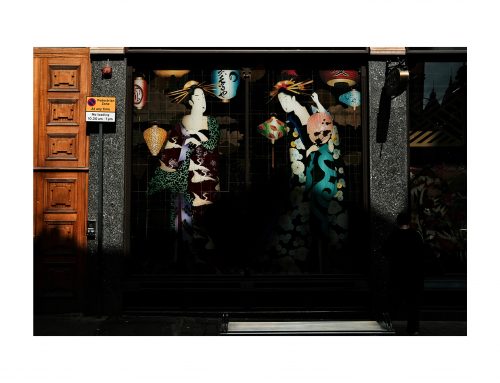
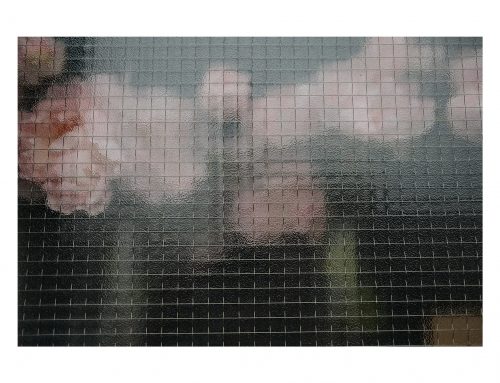
Ok, here’s the interesting bit – the results, I hope you like them. If you’re a freak who just loves to read loads of text, you can scroll by the photographs to the conclusion at the bottom. The images below were shot on either a Hasselblad 503CW using Fuji 400H or Nikon S3 using Kodak Pro Image 100. They were developed using a Bellini C41 kit and scanned on an Epson V800


The Future
So, the big question. Is it any good?
Yes. It’s the best home processing kit I’ve used. It’s certainly the one that’s got me nearer to lab quality than any other that I’ve used. Colours are good and well saturated. Contrast is great and it has the punch that I was missing. It’s a pretty fast and easy process too although, you need to be at the top of your game to manage some of the rapid chemical changes. Again I have to stress that this is only my opinion of it and others may have a different experience, but I’m really happy and I’ll be using it for the foreseeable future.
If you want to give it a go, get over to Nik & trick’s website. It’s where I got it from and they were really helpful.
Also, I’m going to try and get out of the habit of opening the back of the Nikon S3 when it has a film in it.
Discover more from True North
Subscribe to get the latest posts sent to your email.